How to Change Video Background on Mobile Phone
Do you also want to change the background of your video like me and you don’t have a PC or laptop? Then no problem. Today in this Post I will teach you how you can change the background of any video very easily using just your phone.
Video Background Change Tutorial
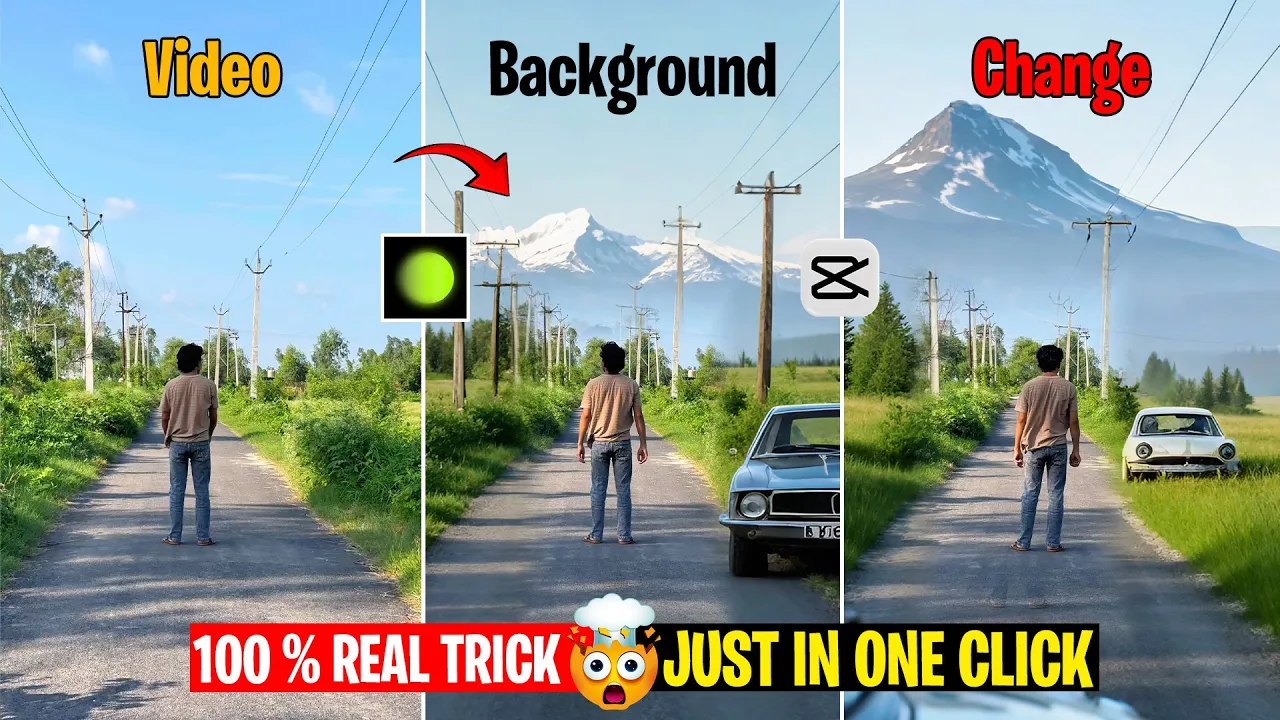
So guys, in today’s post I will tell you how we can easily change any video background by using only our mobile phone. As you saw at the beginning of this video, I changed the background of a video very easily with just one click.
Step 1: Record Your Video
To make such a video, first of all we need to record a video. And guys, you must keep in mind that if you are recording a video, your video should be recorded with a tripod. If your video is not stable then you will not be able to change its background. So first of all, place your phone on any tripod or stable place and record your video like this.
Step 2: Open CapCut App
After recording, go to the CapCut app. Then click on New Project and add your video here. After adding the video, first mute its original music. Then trim the extra parts according to your requirement. After this, make your video full screen and take a screenshot of this clip. After taking the screenshot, click on it and save it in your photo gallery.
Step 3: Crop Your Screenshot
After saving, open it in your gallery and crop it. You can crop with any tool, whether you use PicsArt or simply with your phone’s default crop feature.
Step 4: Download Hipic App
Now guys, to change the background we will need an app called Hipic. You can easily find it on Play Store or App Store. Download it and then open it. After opening, you will see an interface like this. At the top in tools, you will see AI Expand. Click on it and upload the screenshot we took earlier. After uploading, you will see some tools. First remove it with the cross mark, then go to the crop tool. Crop it properly so that only your body part is visible and the outside background is removed. Then click on the check mark.
Step 5: Generate New Background
Now in the tools you will again see AI Expand. Click on it and give position to the picture. Here you have to put a prompt. For example, on the screen I show you a prompt sentence. Copy and paste this sentence here. If you want to change it, you can. Like if it says car, you can change it to bike or something else. If it says mountains, you can change that too. After pasting the prompt, click Allow and then click on Generate. It may take some time depending on your internet speed. If your internet is good, it won’t take much time.
Step 6: Select Generated Image
After waiting a few seconds, you will see that our image has been generated. Three images will be generated, you can select whichever one you like and apply it. After that click Done. On the top, you will see an export option. Export and download the image here. And guys, if you want multiple images, you can use the same prompt again and again and every time you will get a different generated image.
Step 7: Add Background in CapCut
Now go back to the CapCut app. Go to Overlay → Add Overlay and add the image we downloaded from Hipic. After adding, first reduce the opacity and match it with your background. Then go to Tools → Mask and select the rectangle tool. Place it over your body part. Then you will see an Invert option, click on it and invert it. Then give a fade effect. After this, set opacity to 100 and also set the length to 100.
Final Result
Alright guys, you can see that the background of our video has changed. First, let me show you. Earlier the background was like this, and now it has been changed like this. You can use multiple images to change backgrounds in different ways. And it is very easy. If you follow step by step, you will easily be able to change your video background.
Conclusion
So guys, that’s it in this video. Now let’s export it. If you liked the video, then like it. And if you are new to the channel, then subscribe too. That’s it for today’s video. See you in the next video.
For more editing tools, you can also check out Adobe Express or Canva Video Editor.